Recovering our RV valences turned out to be a very worthwhile project, and nothing says “good times” like a little DIY project. And nothing screams DIY like owning an RV. Like any home purchased, there is no lack of decorating items that need to go when the new owners move in. Being a trailer from 2005, it is astonishing how much of the interior felt like it was stuck in a time warp from another decade or two earlier.
For us, the most noticeable things inside our RV that made it feel dated are:
- The upholstery fabric style – some of that is tackled in this post.
- Counter top finishes – one day soon
- Master Bedroom headboard – it’s as dated as the valences, only worse.
- Flooring – maybe next season or as a winter-time project.
- General color scheme.
Over time, we’ll be addressing all of them
This particular DIY was selected because like picking low hanging fruit, we would get the greatest yield for the lowest investment in resources. Like many DIY projects, the idea sounded like it should be fast and easy. When the proverbial rubber met the proverbial road, the “fast” part was clearly not in the cards. But with a little planning it was indeed easy, just not speedy. Coming in at a minimum of one-hour for each RV valence, they were completely worth the effort. The change to the feel of the RV was unbelievable and a big success. Because we have so many windows, the valences play a pretty big role in the overall feel of the interior design of this RV.
Luckily, I’m married to an amazing and creative woman who did a fine job of selecting the right and perfect fabrics to compliment the direction we’re heading in design as well as representing who we are and what we like. The RV had WAY too much maroon, and nearly all of it will be replaced to work with our planned denim and stars based Americana theme. While I tackled the valence project, dear wife wrangled the RV’s seat covers into submission. You go girl!
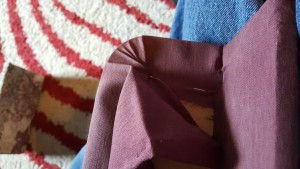
The first step for me was to remove the valences so they could be dis-assembled and stripped of the solid maroon fabric on the privacy shields.
 Once removed from the trailer, I used a small pry bar to gently separate the privacy shields from the valence top. Take your time on this, you don’t want to crack any parts. Ours were made from Oriented Strand Board (OSB) and MDF so cracking was not a major risk, but your mileage may vary. To keep things simple and the clutter at a minimum, I worked on one valence at a time, from start to finish. This also allowed us to see how a completed unit would look in the RV before committing to recovering all of them.
 |
Next up I took photos and careful notes on how the fabric was wrapped on the pieces before stripping them bare. I payed careful attention to how the rounded corners and all the tucks and folds were handled. I pulled a few staples, took notes, snapped a pic and pulled a few more until I ran into something worth noting.
With the fabric off, it was measured for size so new fabric could be cut to match. |
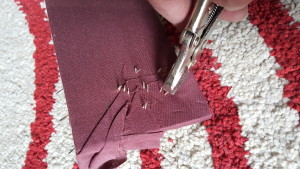 |
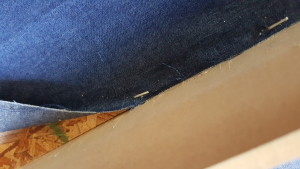
I swear to you that the RV builders have stock in staple manufacturing companies. They are a staple-happy bunch! To get these out and avoid damaging the wood by digging at them, I pulled them from the pokey side of the staples. I started with the staples that used to hold the parts together. What you see here are the legs of the staples poking through. The simple approach is to grab ONE leg of a staple with a vice-grip and pry it out with the same motion you would use when using a claw hammer to pry out a nail. When you pull the one leg, the other will suck down and the whole staple will pull out like a little wire.
I kept track of these for disposal in a little container; mostly because pulling them out of my feet if I stepped on them didn’t sound like fun |
 |
When pulling, they will often break and leave one leg hanging. If you can’t quite get it with the vice-grips, you can grip(not cut) the little bugger with wire cutters and gently pry it out. |
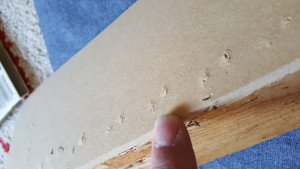 |
Bumps, bumps and bumps. After all the fabric and staples were removed, the little zits left in the wood need to be removed. I learned from experience that leaving them behind was a bad idea. They showed through the smoother fabric we chose and that piece had to be done again. The multitudes of sins hidden by the busy pattern of the original ugly fabric was surprising. I’m amazed at what can be disguised if the pattern is distracting enough. Like that old saying: “If you can’t dazzle them with brilliance – baffle them with B.S.!” |
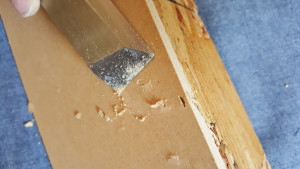 |
I used this super handy DIY multi-tasker to carefully scrape the bumps off the top. Any sharp wood chisel will do, or sand paper, though it would take more time. Be careful and take the time to do it well. You’ll be living with the results much longer than the short time it will take to scrape. |
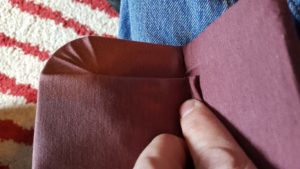 |
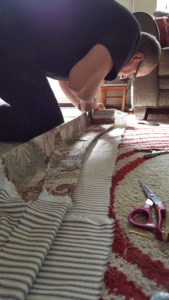
Referring back to my phone pics like this one, and notes on the original wrapping techniques used, the denim fabric was cut to size and the assembly began. Wrapping the rounded corners was the most challenging part. After completing three or four of them I finally felt like I was beginning to get the hang of it. |
 |
Be sure that your new staples go into the OSB, and NOT the MDF! They grip much better in the OSB and won’t cause the bumps that you will get on the MDF. Continue to wrap the piece following your notes and pics for reference. Since I was putting my staples in a different spot than the factory, I had to modify my wrap a tiny bit. |
 |
For the tops of the valences I chose to leave the original fabric in place and just cover over it. Mostly because I was quite done with pulling staples ( did I mention the thousands of staples used by the Dutchmen factory?), But after doing one valence as a test without the old fabric and comparing results, I preferred the more “padded” appearance of leaving the old stuff in place. |
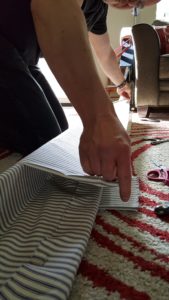 |
The shorter valences could be covered with one piece of the ticking material, but the longer units required some seam matching of two pieces of material. Rather than sewing them together ( my sewing skills are non-existent) , 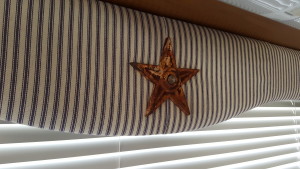 I stapled the first half in place then for the second, I folded the edge under and carefully aligned things to make the seam blend as nicely as possible. For the finishing touch, I pushed an awl through the fabric and wood, threaded a machine screw through the back and using a metal stand-off, attached these old weathered iron stars we’ve been hoarding for years. We love the look with these embellishments! I stapled the first half in place then for the second, I folded the edge under and carefully aligned things to make the seam blend as nicely as possible. For the finishing touch, I pushed an awl through the fabric and wood, threaded a machine screw through the back and using a metal stand-off, attached these old weathered iron stars we’ve been hoarding for years. We love the look with these embellishments! |
Looking back, I might do a few things differently when re-upholstering the valences.
Being handy with power tools, I think I would have torn down two to use as templates and just cut new pieces from OSB and build from scratch. This would have been faster and less hassle than pulling 18 pounds of staples. Okay, so I exaggerated a bit— 16 pounds of staples.;-)
The factory method for hanging these is L-brackets on the sides, and screws into the cabinets when possible. When no cabinets were available, more L-brackets. If we do this project again I would eliminate the L-brackets and use molding as cleats behind the valence for a more attractive and secure attachment to the wall.
Here’s a tip for your RV valence recovering project:
While the old school staple guns will work, do yourself a favor and get one with the handle reversed like this one. I was only part way through the second valence before I was fed up with trying to use both hands and all my body weight to keep enough pressure on the front of my old staple gun to get the staples to hold. This type allowed me to use one hand to staple, one to hold the fabric and time and effort cut in half!